

ConoHaのVPS(UbuntuServer 22.04)にMastodon 4.1.0をインストールする手順です
インストール環境
こちらの環境にMastodonをインストールしていきます。
- サーバ名: mastodon.server-memo.net
- OS: UbuntuServer 22.04 LTS
- Mastodon: 4.1.0
- Ruby: 3.0.5
- Node.js: 16
- PostgresSQL: 15.1
- Nginx: 1.23.3
- Postfix: 3.6.4
Mastodonからメール送信するたのSMTPサーバとして、自サーバにインストールされたPostfixを使用しています。
Postfixのインストールについては下記のページで説明をしていますので参考にしてみてください。

外部のSMTPサーバを使用する場合は、Postfixをインストールする必要はありません。
swap領域の追加(サーバのメモリが1Gの場合)
Mastodonを動作させるためにはメモリが多く必要なので、サーバのメモリは2G以上がおすすめとなります。
ですが、「お試しでちょっと使ってみたい」、「費用を抑えたい」といった理由等でメモリが1GのVPSにMastodonをインストールすると途中でエラーが発生してしまいます。
その対策として、事前に2Gほどswap領域を追加しておく必要があります。(追加分とあわせて4Gのスワップ領域を確保しておきます)
swap領域の追加方法は下記のページで説明しています。
サーバのメモリが少ない場合、インストールしたMastodonは複数ユーザを登録せず、一人だけの状態で運用することをおすすめします。
前提条件アプリインストール
インストール作業に必要な下記アプリケーションをインストールします。
- curl
- wget
- gnupg2
- apt-transport-https
- lsb-release
- ca-certificates
- ubuntu-keyring
$ sudo apt update
$ sudo apt install curl wget gnupg2 apt-transport-https lsb-release ca-certificates ubuntu-keyring
Nginxインストール
WebサーバであるNginxをインストールします。
Nginxのインストール手順は、こちらで説明していますので参照願います。
Let's EncryptでSSL/TLS証明書取得
Let's EncryptでSSL/TLS証明書の取得手順は、こちらで説明していますので参照願います。
なお、手順に書かれているホスト名やディレクトリ名は適宜読み替えてください。
動作確認と設定ファイルの無効化
Mastodonをインストールした後に用意されている雛形から設定ファイルを作成するので、今回作成した設定ファイルについては名前を変更して無効化しておきます。
/etc/nginx/conf.dディレクトリにある設定ファイルは、最後が.confとなっているものが読み込まれます。
ですので、下記のようにファイル名の最後を変更し.confで終わらない名前にすることで、設定が読み込まれなくなります。
$ cd /etc/nginx/conf.d/
$ sudo mv 設定ファイル.conf 設定ファイル.conf_disable
設定ファイルの名前は適宜読み替えてください。
.confの後につける文字には決まりが無いので、_disable以外の文字を追加しても問題ありません。
Node.jsインストール
Node.jsの1.16系をインストールします。
$ cd
$ curl -sL https://deb.nodesource.com/setup_16.x | sudo -E bash -
$ sudo apt update
$ sudo apt -y install nodejs
PostgreSQLインストール
PostgreSQLのインストール行っていきます。
$ wget --quiet -O - https://www.postgresql.org/media/keys/ACCC4CF8.asc | sudo gpg --dearmor -o /usr/share/keyrings/pgdg.gpg
$ sudo sh -c 'echo "deb [signed-by=/usr/share/keyrings/pgdg.gpg] http://apt.postgresql.org/pub/repos/apt $(lsb_release -cs)-pgdg main" > /etc/apt/sources.list.d/pgdg.list'
$ sudo apt update
$ sudo apt -y install postgresql postgresql-contrib
データベースユーザ作成
Mastodonで使用するデータベースのユーザを作成します。
$ sudo su - postgres
$ psql
psql (15.1 (Ubuntu 15.1-1.pgdg22.04+1))
Type "help" for help.
postgres=# CREATE USER mastodon CREATEDB;
postgres=# exit
$ exit
システムパッケージインストール
その他必要なパッケージをインストールします。
$ sudo apt install -y \
imagemagick ffmpeg libpq-dev libxml2-dev libxslt1-dev file git-core \
g++ libprotobuf-dev protobuf-compiler pkg-config gcc autoconf \
bison build-essential libssl-dev libyaml-dev libreadline6-dev \
zlib1g-dev libncurses5-dev libffi-dev libgdbm-dev \
redis-server redis-tools libidn11-dev libicu-dev libjemalloc-dev
Yarnのバージョン設定
Mastodonはバージョン1.0(classic)系のYarnが必要なので、そちらを使用するように設定します。
$ sudo corepack enable
$ yarn set version classic
Rubyインストール
mastdonユーザ作成
masutodonを動作させるためのユーザを作成します。
adduserコマンドを実行した後の質問部分は、Enterキーを押下して初期設定のままで良いです。
$ sudo adduser --disabled-login mastodon
Adding user `mastodon' ...
Adding new group `mastodon' (1002) ...
Adding new user `mastodon' (1002) with group `mastodon' ...
Creating home directory `/home/mastodon' ...
Copying files from `/etc/skel' ...
Changing the user information for mastodon
Enter the new value, or press ENTER for the default
        Full Name []:
        Room Number []:
        Work Phone []:
        Home Phone []:
        Other []:
Is the information correct? [Y/n]
Rubyインストール
Rubyのインストールはmastodonユーザで行います。
$ sudo su - mastodon
ruby 3.0.5をインストールしていきます。(2024.01.26時点でのRuby3.0系の最新版)
「RUBY_CONFIGURE_OPTS=--with-jemalloc rbenv install 3.0.5」コマンド実行後にRubyのダウンロードとインストールが始まります。
ダウンロードには時間が掛かりますので、気長に待ちましょう。
$ git clone https://github.com/rbenv/rbenv.git ~/.rbenv
$ echo 'export PATH="$HOME/.rbenv/bin:$PATH"' >> ~/.bashrc
$ echo 'eval "$(rbenv init -)"' >> ~/.bashrc
$ exec bash
$ git clone https://github.com/rbenv/ruby-build.git ~/.rbenv/plugins/ruby-build
$ RUBY_CONFIGURE_OPTS=--with-jemalloc rbenv install 3.0.5
$ rbenv global 3.0.5
インストール完了後にrubyのバージョンを表示させて、問題が無いかを確認しておきます。
$ ruby -v
ruby 3.0.5p211 (2022-11-24 revision ba5cf0f7c5) [x86_64-linux]
bundlerインストール
gemを使ってbundlerをインストールします。
$ gem install bundler --no-document
ちなみにbundlerとは、gemの依存関係やバージョンの管理をしてくれるツールのことです。
Mastodonインストール
インストールはmastodonユーザのままで行います。
gitを使ってMastodonの最新stable版をダウンロードします。
$ git clone https://github.com/mastodon/mastodon.git live && cd live
$ git checkout $(git tag -l | grep -v 'rc[0-9]*$' | sort -V | tail -n 1)
Rubyの依存関係をインストール
$ rbenv local 3.0.5
$ bundle config deployment 'true'
$ bundle config without 'development test'
$ bundle install -j$(getconf _NPROCESSORS_ONLN)
yarnでjavascript(Node.js)の依存関係をインストールします。
$ yarn install --pure-lockfile
yarn install v1.22.19
[1/6] Validating package.json...
[2/6] Resolving packages...
[3/6] Fetching packages...
[4/6] Linking dependencies...
warning Workspaces can only be enabled in private projects.
[5/6] Building fresh packages...
[6/6] Cleaning modules...
Done in 62.58s.
インストールウィザードの実行
インストールウィザードを実行して、Mastodonのインストールを行っていきます。
サーバのメモリが1Gの場合
サーバのメモリが少ないとインストール途中でエラーが発生してしまいます。
FATAL ERROR: Reached heap limit Allocation failed - JavaScript heap out of memory
その対策として下記コマンドでnode.jsで使用するメモリをエラーの出ないサイズに設定します。
$ export NODE_OPTIONS="--max-old-space-size=2048"
※本手順の一番最初に記述してあるswap領域の追加が完了している必要があります。
インストール
下記のコマンドを実行することでインストールウィザードが実行されます。
$ RAILS_ENV=production bundle exec rake mastodon:setup
実行すると、インストールに必要な質問をされるので答えていきます。
(Y/n)といったような質問の場合は大文字で表示されている方が初期設定となるので、Enterキーを押下するとそちらが選択されます。
初期設定以外の選択をしたい場合は、そちらのキーを入力してからEnterキーを押下します。
その他は()で囲まれている内容が初期設定となりますで、そのままの設定で良い場合はEnterキーを押下し、初期設定以外の内容を設定したい場合は、変更した設定を入力してEnterキーを押下します。
初期設定値が無い質問は、必要な設定を入力してEnterキーを押下します。
| 項目 | 設定内容 |
|---|---|
| Domain name: | Mastodonのサーバ名を設定 nginxで設定しているサーバ名と同じにする |
| Do you want to enable single user mode? (y/N) | シングルユーザのサーバとして使用する場合「y」を、そのままEnterキーを押下すると複数ユーザで使用できるサーバとなる |
| Are you using Docker to run Mastodon? (Y/n) | Dockerを使用してMasutodonを動作させるかの質問。本手順ではDockerを使用しないので「n」を入力 |
| PostgreSQL host: (/var/run/postgresql) | 使用するPostgreSQLサーバを設定。変更はないのでそのままEnterキーを押下 |
| PostgreSQL port: (5432) | PostgreSQLのポート番号を設定。変更はないのでそのままEnterキーを押下 |
| Name of PostgreSQL database: (mastodon_production) | データベース名を設定。変更はないのでそのままEnterキーを押下 |
| Name of PostgreSQL user: (mastodon) | データベースの管理ユーザ名を設定。変更はないのでそのままEnterキーを押下 |
| Password of PostgreSQL user: | データベース管理ユーザのパスワードを設定。パスワードは設定していないのでそのままEnterキーを押下 |
| Redis host: (localhost) | 使用するRedisサーバを設定。変更はないのでそのままEnterキーを押下 |
| Redis port: (6379) | Redisサーバのポート番号を設定。変更はないのでそのままEnterキーを押下 |
| Redis password: | Redisサーバのパスワードを設定。パスワードは設定していないのでそのままEnterキーを押下 |
| Do you want to store uploaded files on the cloud? (y/N) | 画像や動画などのデータをクラウドサービスにアップロードするかの設定。今回はクラウドを使用しないのでそのままEnterキーを押下 |
| Do you want to send e-mails from localhost? (y/N) | Mastodonからの送信するメールをlocalhosから行うかの設定。変更はないのでそのままEnterキーを押下 |
| SMTP server: (smtp.mailgun.org) | メール送信を行うSMTPサーバの設定。使用するSMTPサーバ名を入力 |
| SMTP port: (587) | SMTPサーバのポート番号を設定。使用するSMTPサーバにあわせて入力 |
| SMTP username: | SMTPサーバのユーザ名を入力 |
| SMTP password: | SMTPサーバユーザのパスワードを入力 |
| SMTP authentication: (plain) | SMTPサーバの認証方法を入力。使用するSMTPサーバの仕様を確認(わからない場合はそのままEnterキーを押下して試してみてください) |
| SMTP OpenSSL verify mode:(Press ↑/↓ arrow to move and Enter to select) | SMTPサーバがSSL/TLS証明書を確認する方法を選択。使用するSMTPサーバの仕様を確認(わからない場合はnoneを選択してみてください) |
| Enable STARTTLS: | SMTPサーバでのSTARTTLSを使用するかの設定。使用するSMTPサーバの仕様を確認(わからない場合はautoを選択してみてください) |
| E-mail address to send e-mails "from": | Mastodonから送られてくるメールのFromを入力。変更しない場合はEnterキーを押下 |
| Send a test e-mail with this configuration right now? (Y/n) | メール送信関する設定のテストを行うかの設定。テストを行うのでEnterキーを押下 |
| Send test e-mail to: | テストメールの送信先アドレスを入力 |
| Save configuration? (Y/n) | 設定を保存するかの設定。そのままEnterキーを押下 |
| Prepare the database now? (Y/n) | Mastodon用のデータベースを作成するかの設定。そのままEnterキーを押下 |
| Compile the assets now? (Y/n) | Mastodonで使用するassetsをコンパイルするかの設定。そのままEnterキーを押下 |
| Do you want to create an admin user straight away? (Y/n) | Mastodonの管理者ユーザを作成するかの設定。そのままEnterキーを押下 |
| Username: (admin) | 管理者のユーザ名を入力 |
| E-mail: | 管理者のメールアドレスを入力 |
| You can login with the password: | 初回ログイン時に使用するパスワードが表示されるので、無くさないように保存しておいてください |
実行例
実際にRAILS_ENV=production bundle exec rake mastodon:setupを実行した際のログとなります。
サーバ名はmastodon.server-memo.netとしていますので、実際にインストールを行う場合はご自分のサーバ名に読み替えて作業を行ってください。
SMTP(メール)サーバはlocalhostにインストールされたものを使用して、そこにSMTP AUTHを使って接続するようにしています。
$ RAILS_ENV=production bundle exec rake mastodon:setup
Your instance is identified by its domain name. Changing it afterward will break things.
Domain name: mastodon.server-memo.net ### Mastodonのサーバ名を入力

Single user mode disables registrations and redirects the landing page to your public profile.
Do you want to enable single user mode? (y/N)   ### シングルユーザ(お一人さま)サーバとするかの設定 Enterキーを押下

Are you using Docker to run Mastodon? (Y/n) n   ### Docker環境でmasotodonをどうさせるかの設定 nを入力

PostgreSQL host: (/var/run/postgresql)   ### PostgreSQLの場所 Enterキーを押下
PostgreSQL port: (5432)  ### PostgreSQLのポート番号 Enterキーを押下
Name of PostgreSQL database: (mastodon_production)  ### 作成するデータベース名 Enterキーを押下
Name of PostgreSQL user: (mastodon)  ### データベースの管理ユーザ名 Enterキーを押下
Password of PostgreSQL user: ### 管理ユーザのパスワード Enterキーを押下
Database configuration works! 🎆

Redis host: (localhost)   ### Redisがインストールされていサーバ Enterキーを押下
Redis port: (6379) ### Redisのポート番号 Enterキーを押下
Redis password: ### Redisのパスワード Enterキーを押下

Do you want to store uploaded files on the cloud? (y/N)  ### アップロードするファイル保存先としてcloudサービスを使用するかどうか Enterキーを押下
Do you want to send e-mails from localhost? (y/N)  ### メールサーバとしてlocalhostを使用するかどうか Enterキーを押下

SMTP server: (smtp.mailgun.org) localhost  ### SMTPサーバを指定 今回はlocalhostにインストールされているpostfixでsmtp authを使用
SMTP port: (587) ### Enterキーを押下
SMTP username: ユーザ名  ### SMTP auth 認証用ユーザを指定
SMTP password: xxxxxxxx  ### パスワードを入力
SMTP authentication: (plain) ### SMTP authの認証方式を設定 Enterキーを押下
SMTP OpenSSL verify mode: (Press ↑/↓ arrow to move and Enter to select)
‣ none ### noneを選択してEnterキーを押下
  peer
  client_once
  fail_if_no_peer_cert
Enable STARTTLS: (Press ↑/↓ arrow to move and Enter to select)
‣ auto ### autoを選択してEnterキーを押下
  always
  never
E-mail address to send e-mails "from": (Mastodon <notifications@mastodon.server-memo.net>)  ### Mastodonから送られてくるメールのFromを設定 Enterキーを押下
Send a test e-mail with this configuration right now? (Y/n) ### メールの送信テストを行うかの確認 Enterキーを押下
Send test e-mail to: 送信先メールアドレス ### テストメールの送信先を指定

This configuration will be written to .env.production
Save configuration? (Y/n) ### Enterキーを押下

Now that configuration is saved, the database schema must be loaded.
If the database already exists, this will erase its contents.
Prepare the database now? (Y/n)  ### Enterキーを押下

Running `RAILS_ENV=production rails db:setup` ...


Created database 'mastodon_production'
Done!

The final step is compiling CSS/JS assets.
This may take a while and consume a lot of RAM.
Compile the assets now? (Y/n)  ### Enterキーを押下

Running `RAILS_ENV=production rails assets:precompile` ...


yarn install v1.22.19
[1/6] Validating package.json...
[2/6] Resolving packages...
[3/6] Fetching packages...
[4/6] Linking dependencies...
warning Workspaces can only be enabled in private projects.
[5/6] Building fresh packages...
[6/6] Cleaning modules...
Done in 13.72s.
I, [2023-02-13T22:59:00.190553 #3729]  INFO -- : Writing /home/mastodon/live/public/assets/doorkeeper/admin/application-a644908e7bab54fb749be0f59fb64a7480bbf9c4c2b79d4a65791cb7ab4d8730.css
I, [2023-02-13T22:59:00.191944 #3729]  INFO -- : Writing /home/mastodon/live/public/assets/doorkeeper/admin/application-a644908e7bab54fb749be0f59fb64a7480bbf9c4c2b79d4a65791cb7ab4d8730.css.gz
I, [2023-02-13T22:59:00.212408 #3729]  INFO -- : Writing /home/mastodon/live/public/assets/doorkeeper/application-c93dac2ad9d65e3393e0e2c958481e86ef7a5e5b0f6ce406842a7b99b25a4850.css
I, [2023-02-13T22:59:00.212891 #3729]  INFO -- : Writing /home/mastodon/live/public/assets/doorkeeper/application-c93dac2ad9d65e3393e0e2c958481e86ef7a5e5b0f6ce406842a7b99b25a4850.css.gz
I, [2023-02-13T22:59:00.223974 #3729]  INFO -- : Writing /home/mastodon/live/public/assets/pghero/favicon-db10337a56c45eb43c22ff5019546b520fa22c7281d4d385f235cbca67ed26bb.png
I, [2023-02-13T22:59:00.815549 #3729]  INFO -- : Writing /home/mastodon/live/public/assets/pghero/application-a60bf0a452ed064fef3594cf52a4c998712da7c76150f890f4eaa644f59671e4.js
I, [2023-02-13T22:59:00.816564 #3729]  INFO -- : Writing /home/mastodon/live/public/assets/pghero/application-a60bf0a452ed064fef3594cf52a4c998712da7c76150f890f4eaa644f59671e4.js.gz
I, [2023-02-13T22:59:00.835309 #3729]  INFO -- : Writing /home/mastodon/live/public/assets/pghero/application-c31338f656687c1d733bb0f48d40acd076e24060f3dcff83b34870e4ccc2789d.css
I, [2023-02-13T22:59:00.836003 #3729]  INFO -- : Writing /home/mastodon/live/public/assets/pghero/application-c31338f656687c1d733bb0f48d40acd076e24060f3dcff83b34870e4ccc2789d.css.gz
Compiling...
Compiled all packs in /home/mastodon/live/public/packs
Done!

All done! You can now power on the Mastodon server 🐘

Do you want to create an admin user straight away? (Y/n) ### Enterキーを押下
Username: (admin) ユーザ名 ### Mastodon管理者ユーザ名設定
E-mail: ### 管理者ユーザのメールアドレスを入力
You can login with the password: 877ebb53674fbeb4a7f573991d5e5589  ### ログイン時に入力するパスワードが表示される
You can change your password once you login.
You can login with the passwordで表示されるパスワードはMastodonにログインする際に必要なので、メモやスクショを撮る等してなくさないようにしてください。
mastodonユーザから元のユーザへ
作業が終わったらmastodonユーザから元のユーザに戻ります。
$ exit
nginx設定
Mastodonであらかじめ用意されているnginx用設定ファイルをコピーしてから、設定の変更を行っていきます。。
$ sudo cp -p /home/mastodon/live/dist/nginx.conf /etc/nginx/conf.d/mastodon.conf
$ sudo vi /etc/nginx/conf.d/mastodon.conf
変更箇所
Mastodonサーバの名前を変更します。
server_nameは2箇所あるので注意してください。
server_name example.com;
      ↓
server_name mastodon.server-memo.net;
SSL鍵の場所をLet's Encryptで取得した鍵に変更します。
# ssl_certificate     /etc/letsencrypt/live/example.com/fullchain.pem;
# ssl_certificate_key /etc/letsencrypt/live/example.com/privkey.pem;
↓
ssl_certificate     /etc/letsencrypt/live/mastodon.server-memo.net/fullchain.pem;
ssl_certificate_key /etc/letsencrypt/live/mastodon.server-memo.net/privkey.pem;
設定反映
nginxを再起動して設定を反映させます。
$ sudo systemctl restart nginx
パーミッション変更
nginxからアクセスできるように/home/mastodon/のパーミッションを750から755へ変更します。
$ sudo chmod 755 /home/mastodon/
Mastodon起動設定
Mastodonの自動起動設定とサービスの起動を行います。
$ sudo cp /home/mastodon/live/dist/mastodon-*.service /etc/systemd/system/
$ sudo systemctl daemon-reload
$ sudo systemctl enable --now mastodon-web mastodon-sidekiq mastodon-streaming
動作確認
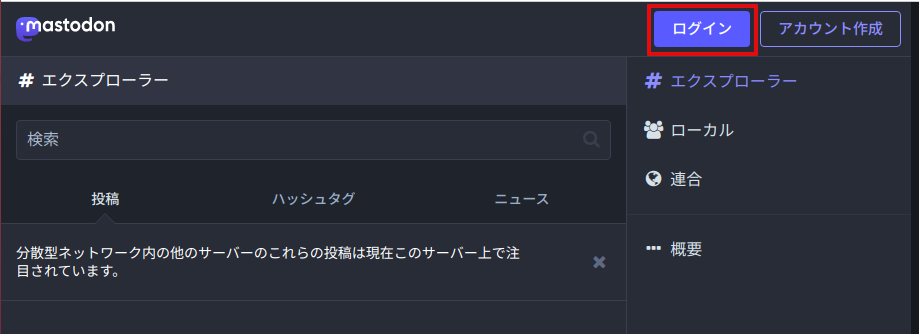
webブラウザでアクセスしてMastodonが動作しているかの確認を行います。
ログインをクリックします。
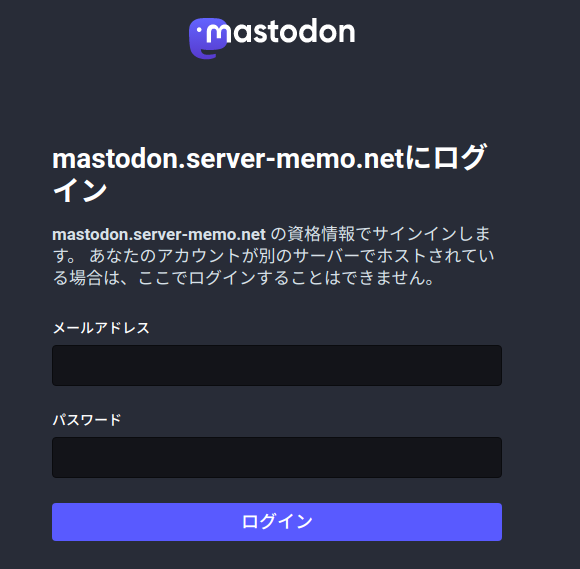
インストール時に設定した、管理ユーザ用メールアドレスと表示されていたパスワードを入力して、ログインをクリックします。
ログインが完了するとこんな感じの画面が表示されます。
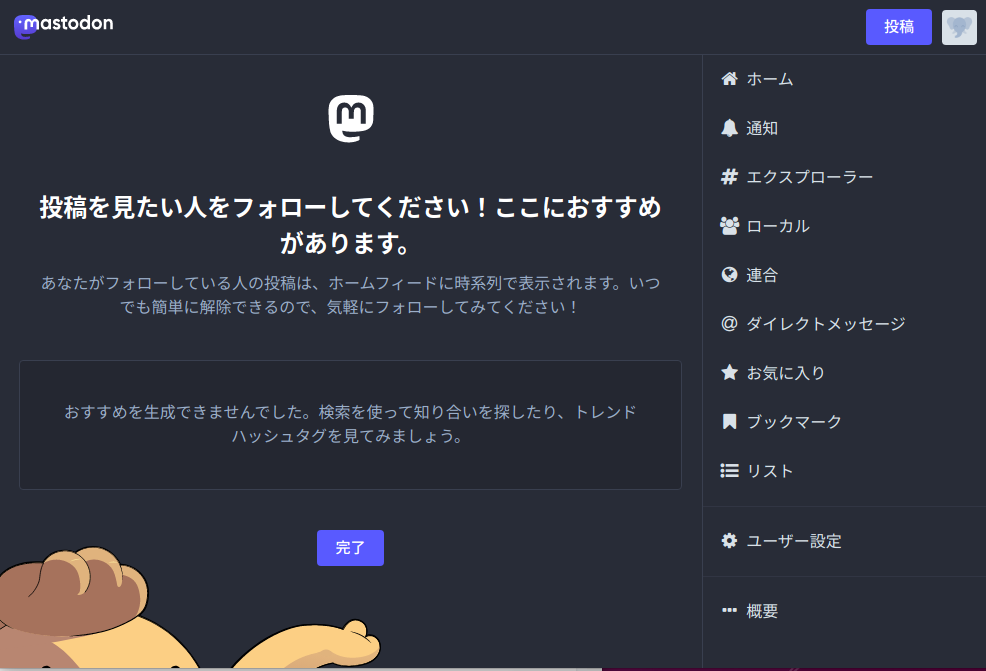
以上でMastodonのインストールは完了となります。

コメント