

Ubuntu Server 20.04にnginx + MariaDB + PHP7.4 + php-fpmの環境でwordpressをインストールする方法です。
作業工程
下記の作業工程でUbuntu Server 20.04 LTSにwordpressをインストールしていきます。
- 80,443ポート通信許可設定
- nginxインストール
- MariaDBインストール
- wordpress用データベース作成
- phpインストール
- php-fpm設定
- wordpressインストール
- nginx設定
- wordpress設定
- Let's Encryptでhttps対応
wordpressをインストールするサーバのホスト名は、事前にDNSに登録してインターネット上で名前解決が出来るようにしておいてください。
80,443ポート通信許可設定
ufwコマンドを使用して、wordpressで使用する「80」「443」番ポートの通信許可設定をファイアウォールに行っていきます。
$ sudo ufw allow 80/tcp
$ sudo ufw allow 443/tcp
$ sudo ufw reload
「ufw status」コマンドで設定の確認を行えます。
$ sudo ufw status
Status: active

To                         Action      From
--                         ------      ----
80/tcp                     ALLOW       Anywhere
443/tcp                    ALLOW       Anywhere
80/tcp (v6)                ALLOW       Anywhere (v6)
443/tcp (v6)               ALLOW       Anywhere (v6)
「Action」部分が「ALLOW」となっていれば通信が許可されています。
nginx
「nginx」の公式サイトにあるリポジトリを使用してインストールを行っていきます。
インストール手順は下記ページにまとめてありますので、そちらを参照願います。
MariaDB
MariaDBの公式サイトで提供されているリポジトリを使用してMariaDBをインストールしていきます。
インストール手順は下記ページにまとめてありますので、「インストール」「mysql_secure_installation」の実行、「文字コードの設定」作業を行ってください。
wordpress用データベース作成
wordpressで使用するデータベースを作成します。
MariaDBに「root」ユーザで接続して作業を行います。
$ mysql -u root -p
データベースは下記の書式で作成することが出来ます。
CREATE DATABASE データベース名;
今回は「wordpress」という名前のデータベースを作成していきます。
MariaDB [(none)]> CREATE DATABASE wordpress ;
Query OK, 1 row affected (0.000 sec)
複数のwordpressをインストールしていく予定がある場合は、どのサイトのデータベースなのか判別がつく名前で作成しておくと良いでしょう。
ユーザ作成
下記の書式でwordpress用に作成したデータベースの管理ユーザを作成し、データベースに権限を設定します。
GRANT ALL PRIVILEGES ON データベース名.* TO "作成ユーザ"@"localhost" IDENTIFIED BY "パスワード";
本手順では作成するユーザ名とパスワードは下記の内容で設定を行っていきますが、実際に作業を行う場合はお好きなユーザ名とパスワードを設定してください。
- ユーザ名 blogadmin
- パスワード dbpassword
データベースは先ほど作成した「wordpress」を指定しています。
MariaDB [(none)]> GRANT ALL PRIVILEGES ON wordpress.* TO "blogadmin"@"localhost" IDENTIFIED BY "dbpassword";
Query OK, 0 rows affected (0.001 sec)
「FLUSH PRIVILEGES」で設定を反映させ、exitコマンドでMariaDBへの接続を終了します。
MariaDB [(none)]> FLUSH PRIVILEGES;
Query OK, 0 rows affected (0.000 sec)
MariaDB [(none)]> exit
Bye
phpインストール
phpがインストールされていない場合は、インストールを行っていきます。
$ sudo apt update
$ sudo apt install php7.4-cli php7.4-mbstring php-pear php7.4-fpm php7.4-mysql php7.4-curl php7.4-dom php7.4-imagick php7.4-zip php7.4-intl
phpがインストールされているかどうかの確認は「php -v」コマンドで確認することが出来ます。
$ php -v
PHP 7.4.3 (cli) (built: Oct  6 2020 15:47:56) ( NTS )
Copyright (c) The PHP Group
Zend Engine v3.4.0, Copyright (c) Zend Technologies
    with Zend OPcache v7.4.3, Copyright (c), by Zend Technologies
php-fpm 設定
nginxでphp-fpmを使用できるように「/etc/php/7.4/fpm/pool.d/www.conf」を編集します。
$ cd /etc/php/7.4/fpm/pool.d/
$ sudo cp -p www.conf www.conf_`date +%Y%m%d-%H%M%S`
$ sudo vi www.conf
編集内容
下記の項目を初期値のwww-dataからnginxに変更し、listen.modeを0660に編集します。
- user
- group
- listen.owner
- listen.group
変更前
user = www-data
group = www-data

listen.owner = www-data
listen.group = www-data
;listen.mode = 0660
変更後
user = nginx
group = nginx

listen.owner = nginx
listen.group = nginx
listen.mode = 0660
Listen項目を確認
「www.conf」内の「listen」の項目は「nginx」の設定ファイルを作成する際に必要となるため、設定内容を確認をしておいてください。
listen = /run/php/php7.4-fpm.sock
設定反映
pfp-fpmを再起動して設定の反映を行います。
$ sudo systemctl restart php7.4-fpm
nginx設定
「nginx」で「wordpress」用の設定を作成していきます。
まずはhttpでの接続用設定を作成して、wordpressのインストールと動作確認を行い、その後に「Let's Encrypt」でSSLの証明書の取得とhttps用の設定を追加していきます。
今回は作成する設定ファイルの名前をwordpress.confとしていますが、拡張子を.confとする以外は特に決まりはないので自分でわかりやすい名前で作成してください。
$ cd /etc/nginx/conf.d
$ sudo vi wordpress.conf
設定内容
「fastcgi_pass unix:」部分の設定は「php-fpm」の設定ファイル「www.conf」で設定されている「listen = /run/php/php7.4-fpm.sock」に合わせてください。
server {
    listen 80;
    server_name ホスト名;
    root /usr/share/nginx/wordpress;
    index index.php;

    charset utf-8;

# wordpress パーマネントリンク設定
  try_files $uri $uri/ /index.php?q=$uri&$args;

# wp-config.phpへのアクセス拒否設定
  location ~* /wp-config.php {
    deny all;
  }

# php-fpm用設定
  location ~ \.php$ {
    fastcgi_pass unix:/run/php/php7.4-fpm.sock;
    fastcgi_param SCRIPT_FILENAME $document_root$fastcgi_script_name;
    fastcgi_param PATH_INFO $fastcgi_script_name;
    include fastcgi_params;
  }
}
設定反映
nginxの再起動し設定反映を行います。
$ sudo nginx -t
$ sudo systemctl restart nginx
Wrodpressインストール
wordpressのインストールを行っていきます。
ダウンロードと解凍
「/usr/share/nginx/」ディレクトリに最新のwordpress(latest-ja.tar.gz)をダウンロードし解凍します。
ダウンロードしたlatest-ja.tar.gzの解凍を行うと、wordpressというディレクトリが作成されるので所有者の情報をnginxに変更します。
$ cd /usr/share/nginx/
$ sudo curl -O https://ja.wordpress.org/latest-ja.tar.gz
$ sudo tar xzfv latest-ja.tar.gz
$ sudo chown -R nginx:nginx wordpress
wordpressを複数インストールする予定の場合は、どのサイトのwordpressなのかを判断しやすように、「wordpress」というディレクトリの名前を適宜変更しておきましょう。
wp-config.php設定
wordpressの設定ファイルであるwp-config.phpを作成して、下記の設定を行います。
- データベースへの接続情報
- テーブル作成時の文字コード
- 認証用ユニークキー
$ cd wordpress
$ sudo cp -p wp-config-sample.php wp-config.php
$ sudo vi wp-config.php
設定項目
今回の手順では下記のような設定となります。
- データベース名: wordpress
- データベースの管理ユーザ名: blogadmin
- パスワード: dbpassword
- テーブル作成時の文字セット: utf8mb4
認証用ユニークキーの部分は下記の自動生成用URLにアクセスして表示されたものをコピペします。
https://api.wordpress.org/secret-key/1.1/salt/
設定内容
実際に設定を行う部分は下記と項目なります。
/** WordPress のためのデータベース名 */
define( 'DB_NAME', 'wordpress' );

/** MySQL データベースのユーザー名 */
define( 'DB_USER', 'blogadmin' );

/** MySQL データベースのパスワード */
define( 'DB_PASSWORD', 'dbpassword' );

/** データベースのテーブルを作成する際のデータベースの文字セット */
define( 'DB_CHARSET', 'utf8mb4' );

/**#@+
 * 認証用ユニークキー
 *
 * それぞれを異なるユニーク (一意) な文字列に変更してください。
 * {@link https://api.wordpress.org/secret-key/1.1/salt/ WordPress.org の秘密鍵サービス} で自動生成することもできます。
 * 後でいつでも変更して、既存のすべての cookie を無効にできます。これにより、すべてのユーザーを強制的に再ログインさせることになります。
 *
 * @since 2.6.0
 */
自動生成URLにアクセスし生成されたものをコピペします
初期セットアップ
wp-config.phpの設定が終わりましたら、下記のURLにアクセスしてwordpressの初期設定を行います。
http://ホスト名/wp-admin/install.php
「ようこそ」画面が表示されるので、下記の項目を設定したあとにwordpressをインストールをクリックします。
- サイトのタイトル
- ユーザ名
- パスワード
- メールアドレス
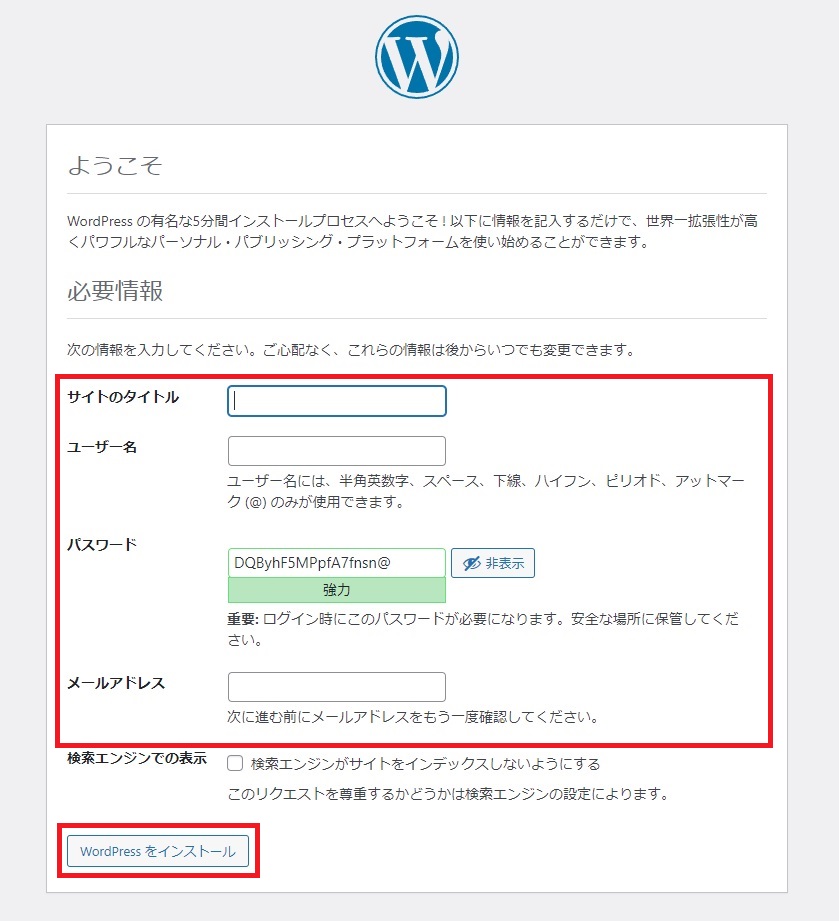
インストール完了画面が表示されるので、作成したユーザ名を確認してログインをクリックします。

動作確認
wordpress管理画面へのログイン画面が表示されていると思いますので、初期セットアップで設定したユーザ名とパスワードを入力してログインボタンをクリックしてログインします。
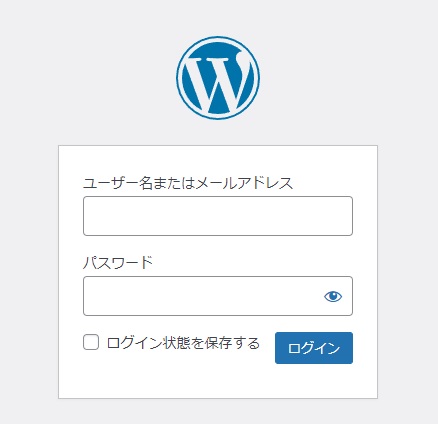
ログイン画面は下記のURLにアクセスすることでも表示させることができます。
http://ホスト名/wp-admin
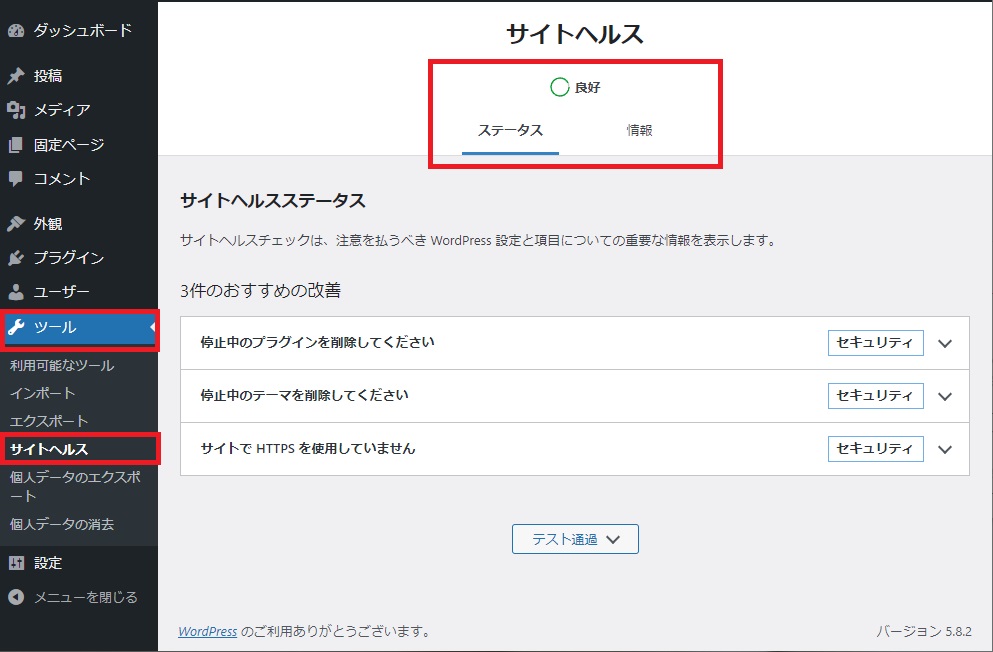
ダッシュボードが表示されるので、左側のメニューから「ツール」-「サイトヘルス」と選択して、サイトヘルスのステータスを確認し良好と表示されているか確認します。
これでwordpressのインストールと動作確認は完了となりますので、次はhttpsで接続できるように設定を行っていきます。
Let's Encryptでhttps対応
httpでwordpressの動作確認ができたら、Let's Encryptで無料のSSL証明書を発行してもらいサイトをhttps対応していきます。
certbotインストール
Let's EncryptでSSL証明書を発行してもらうには、certbotというアプリケーションを使用します。
今回はnginxをwebサーバとして使用するので、nginx用のcertbotインストールしていきます。
$ sudo apt install certbot python3-certbot-nginx
証明書の発行依頼
SSL証明書の発行依頼は下記のコマンドで行います。
- ホスト名 wordpressを公開するサーバ名を設定
- メールアドレス Let's Encryptからの通知を受け取るメールアドレスを設定
$ sudo certbot --nginx -d ホスト名 -m メールアドレス --agree-tos
コマンドを実行してSSL証明書の発行依頼を行うと、SSL証明書を取得すると同時にnginxの設定ファイルにhttps通信用の設定が自動で追記されます。
certbotコマンド実行
今回は下記の内容でcertbotを実行し、SSL証明書の取得を行っていきます。
- ホスト名: sandbox.server-memo.net
- メールアドレス: tamohiko@server-memo.net
certbot実行すると途中で下記の内容について質問されますので、どのような設定をするのかを回答する必要があります。
メールアドレスの共有許可
Lets EncryptのパートナーであるElectronic Frontierとメールアドレスを共有しても良いかの質問されますが、共有してもしなくてもどちらでも特に問題はありませんので、好きな方を入力してください。
- 共有させる場合は「y」を入力
- 共有させたくない場合は「n」を入力
httpsへのリダイレクト設定
httpでの接続をhttpsへリダイレクトする設定にするかどうかの質問があります。
- リダイレクトさせたくない場合は「1」を入力
- リダイレクトさせる場合は「2」を入力
特別な理由がない限りリダイレクトさせてhttps接続させる方が良いので、リダイレクトさせるようにしましょう。
$ sudo certbot --nginx -d sandbox.server-memo.net -m tamohiko@server-memo.net --agree-tos
Saving debug log to /var/log/letsencrypt/letsencrypt.log
Plugins selected: Authenticator nginx, Installer nginx

- - - - - - - - - - - - - - - - - - - - - - - - - - - - - - - - - - - - - - - -
Would you be willing to share your email address with the Electronic Frontier
Foundation, a founding partner of the Let's Encrypt project and the non-profit
organization that develops Certbot? We'd like to send you email about our work
encrypting the web, EFF news, campaigns, and ways to support digital freedom.
- - - - - - - - - - - - - - - - - - - - - - - - - - - - - - - - - - - - - - - -
(Y)es/(N)o: n   # メールアドレスの共有は許可しないのでnを入力
Obtaining a new certificate
Performing the following challenges:
http-01 challenge for sandbox.server-memo.net
Waiting for verification...
Cleaning up challenges
Deploying Certificate to VirtualHost /etc/nginx/conf.d/wordpress.conf

Please choose whether or not to redirect HTTP traffic to HTTPS, removing HTTP access.
- - - - - - - - - - - - - - - - - - - - - - - - - - - - - - - - - - - - - - - -
1: No redirect - Make no further changes to the webserver configuration.
2: Redirect - Make all requests redirect to secure HTTPS access. Choose this for
new sites, or if you're confident your site works on HTTPS. You can undo this
change by editing your web server's configuration.
- - - - - - - - - - - - - - - - - - - - - - - - - - - - - - - - - - - - - - - -
Select the appropriate number [1-2] then [enter] (press 'c' to cancel): 2   # リダイレクト設定行うため2を入力
Redirecting all traffic on port 80 to ssl in /etc/nginx/conf.d/wordpress.conf

- - - - - - - - - - - - - - - - - - - - - - - - - - - - - - - - - - - - - - - -
Congratulations! You have successfully enabled https://sandbox.server-memo.net

You should test your configuration at:
https://www.ssllabs.com/ssltest/analyze.html?d=sandbox.server-memo.net
- - - - - - - - - - - - - - - - - - - - - - - - - - - - - - - - - - - - - - - -

IMPORTANT NOTES:
 - Congratulations! Your certificate and chain have been saved at:
   /etc/letsencrypt/live/sandbox.server-memo.net/fullchain.pem
   Your key file has been saved at:
   /etc/letsencrypt/live/sandbox.server-memo.net/privkey.pem
   Your cert will expire on 2022-02-20. To obtain a new or tweaked
   version of this certificate in the future, simply run certbot again
   with the "certonly" option. To non-interactively renew *all* of
   your certificates, run "certbot renew"
 - Your account credentials have been saved in your Certbot
   configuration directory at /etc/letsencrypt. You should make a
   secure backup of this folder now. This configuration directory will
   also contain certificates and private keys obtained by Certbot so
   making regular backups of this folder is ideal.
 - If you like Certbot, please consider supporting our work by:

   Donating to ISRG / Let's Encrypt:   https://letsencrypt.org/donate
   Donating to EFF:                    https://eff.org/donate-le
これでSSLの証明書が発行され、nginxの設定ファイルにhttps接続用の設定が追記されます。
証明書の保管場所
発行されたSSL証明書は下記の場所に保管されます。
- 証明書:/etc/letsencrypt/live/ホスト名/fullchain.pem
- 秘密鍵:/etc/letsencrypt/live/ホスト名/privkey.pem
nginx設定ファイルに追記されたhttps用設定について
nginxのwordpress用設定ファイルを確認すると、certbotが追記したhttps用の設定部分には「# managed by Certbot」と表示されているので確認してみてください。
$ sudo cat /etc/nginx/conf.d/wordpress.conf
server {
    server_name sandbox.server-memo.net;
    root /usr/share/nginx/wordpress;
    index index.php;

    charset utf-8;

# wordpress パーマネントリンク設定
  try_files $uri $uri/ /index.php?q=$uri&$args;

# wp-config.phpへのアクセス拒否設定
  location ~* /wp-config.php {
    deny all;
  }

# php-fpm用設定
  location ~ \.php$ {
    fastcgi_pass unix:/run/php/php7.4-fpm.sock;
    fastcgi_param SCRIPT_FILENAME $document_root$fastcgi_script_name;
    fastcgi_param PATH_INFO $fastcgi_script_name;
    include fastcgi_params;
  }

    listen 443 ssl; # managed by Certbot
    ssl_certificate /etc/letsencrypt/live/sandbox.server-memo.net/fullchain.pem; # managed by Certbot
    ssl_certificate_key /etc/letsencrypt/live/sandbox.server-memo.net/privkey.pem; # managed by Certbot
    include /etc/letsencrypt/options-ssl-nginx.conf; # managed by Certbot
    ssl_dhparam /etc/letsencrypt/ssl-dhparams.pem; # managed by Certbot

}
server {
    if ($host = sandbox.server-memo.net) {
        return 301 https://$host$request_uri;
    } # managed by Certbot


    listen 80;
    server_name sandbox.server-memo.net;
    return 404; # managed by Certbot


}
設定反映
設定ファイルが作成されたら、nginxを再起動して設定を反映させます。
$ sudo nginx -t
$ sudo systemctl restart nginx
あとはhttpsでwordpressに接続できるかの確認を行ってみて、問題がなければhttps対応作業は完了となります。
wordpressアドレス設定変更
wordpressの管理画面にログインし、左側のメニューから「設定」-「一般」とクリックすると、一般設定の画面が表示されるので、「WordPress アドレス (URL)」と「サイトアドレス (URL)」に設定されているURLの「http://」部分を「https://」に変更して、画面の下にある「変更を保存」ボタンをクリックしてください。


コメント
初めまして shin2と申します
ubuntuでWebsaite構築にこのページを参考にさせて頂いております。
基本的にここのサイト通りの構築で、証明書の発行依頼でエラーが出て暫く足踏み状態が続いております。
何かいいアドバイスが頂ければ幸いです。
■OS >>> Ubuntu Server 22.04 LTS
■ファイアウォール:
$ sudo nano /etc/default/ufw >>> 7: IPV6=no
$ sudo ufw status numbered >>>
Status: active
To Action From
[ 1] 21/tcp ALLOW IN Anywhere # ftp
[ 2] 22/tcp ALLOW IN Anywhere # ssh
[ 3] 80/tcp ALLOW IN Anywhere # local
[ 4] 443/tcp ALLOW IN Anywhere # global
[ 5] Anywhere ALLOW IN 192.168.0.0/24 # local
■ドメイン:
$ ping signpost.mydns.bz
>>>PING signpost.mydns.bz (36.14.247.94) 56(84) bytes of data.
・・・・
Ctrl+C >> OK
■nginx:
$ sudo nano /etc/nginx/nginx.conf
#include /etc/nginx/conf.d/*.conf;
include /etc/nginx/conf.d/server.conf;
$ sudo nano /etc/nginx/conf.d/server.conf
server {
listen 80;
server_name signpost.mydns.bz *.signpost.mydns.bz;
root /mnt/WebSite/signpost;
index index.html;
# for certbot challenges (renewal process)
#location ~ ^/.well-known/acme-challenge/ {
#allow all;
#root /home/www/letsencrypt;
#}
#location = /.well-known/acme-challenge/ {
#return 404;
#}
}
■Let’s Encrypt SSL証明書
$ sudo certbot –nginx -d signpost.mydns.bz -m asanoxxxx@gmail.com –agree-tos
error >>>>>>>>>>>>>>>>>>>>>>>>>>>>>>>>>>>>
・・・・
Hint: The Certificate Authority failed to verify the temporary nginx configuration changes made by Certbot. Ensure the listed domains point to this nginx server and that it is accessible from the internet.
Some challenges have failed.
Ask for help or search for solutions at https://community.letsencrypt.org. See the logfile /var/log/letsencrypt/letsencrypt.log or re-run Certbot with -v for more details.
>>> $ sudo tail -n50 /var/log/letsencrypt/letsencrypt.log
・・・・
Hint: The Certificate Authority failed to verify the temporary nginx configuration changes made by Certbot. Ensure the listed domains point to this nginx server and that it is accessible from the internet.
2025-04-18 10:06:46,909:DEBUG:certbot._internal.error_handler:Encountered exception:
Traceback (most recent call last):
File “/usr/lib/python3/dist-packages/certbot/_internal/auth_handler.py”, line 90, in handle_authorizations
self._poll_authorizations(authzrs, max_retries, best_effort)
・・・・
>>> https://github.com/certbot/certbot/issues/9878
github-actions on Jan 20
We’ve made a lot of changes to Certbot since this issue was opened. If you still have this issue with an up-to-date version of Certbot, can you please add a comment letting us know? This helps us to better see what issues are still affecting our users. If there is no activity in the next 30 days, this issue will be automatically closed.
この問題が報告されてから、Certbot には多くの変更が加えられました。最新バージョンの Certbot でもこの問題が引き続き発生する場合は、コメント欄にご記入ください。これにより、ユーザーに影響のある問題をより適切に把握できるようになります。
>>>>>>>>>>>>>>>>>>>以上の事からエラーが全然解からなくなっています
なにかいいアドバイスが有りましたらご教授願います。
community.letsencrypt.org でも良い回答は得られませんでした。
また長々の問い合わせで恐縮しております。
raspiからThinkCentre へ移行しようと思っております
PS Let’s Encryptの登録が10億件超えたので、登録制限しているのかと思っちゃう
https://gigazine.net/news/20200228-lets-encrypt-issued-billion-certificates/
shin2さん
コメントありがとうございます。
お返事が遅くなってしまい申し訳ありません。
ログを見るとドメインの認証関連で失敗しているようにみえるのですが、Webブラウザで「http://signpost.mydns.bz」にはアクセスすることができるのですよね。
であれば、certbotを実行する際に「-v」オプションも一緒につけてみると、より詳しい情報が表示されるので、問題の切り分けに役立つかもしれませんので、試してみてもらえますか?
tamohiko様 ご返事有難うございます
※問い合わせの返事ですが
http://signpost.mydns.bz」にはアクセスできています
環境及び経緯の説明ですが、以下の様になっています
【機器関係図】
auホームゲートウェイ ━ バッファロー親機
~~~~~無線
バッファロー子機
┣ PC(SSH)
┣ Raspi4(サイト開設中)ポート80,443等開放中 *.mydns.jp
┗ ThinkCentre(Raspiサイト移行中)ポート80,443等開放中 *.mydns.bz
※サイトをThinkCentreに移行作業をしています。内容は現サイト+αなので違うURLで構築して、RaspiのURLに移行しようと思っています。<<< 結果的にこの作業を行いたいのですが…
その後の検証ですが、Raspiをシャットダウンしてcertbotを実行しましたらエラー内容が変わりました。
$ sudo certbot -vv –nginx -d signpost.mydns.bz -m xxxxxxx@gmail.com –agree-tos
befor:Raspi4起動中
Domain: signpost.mydns.bz
Type: unauthorized
Detail: 36.14.247.94: Invalid response from http://signpost.mydns.bz/.well-known/acme-challenge/R_UIHLFaGQh45oofu4ZXF0p2PpsfjPmi0IEkHO633s8: 404
after:Raspi4シャットダウン
Domain: signpost.mydns.bz
Type: connection
Detail: 36.14.247.94: Fetching http://signpost.mydns.bz/.well-known/acme-challenge/7PIDDxfOeFObokv0VZZV3Fl3IzfN152xqu66fRH7qNc: Timeout during connect (likely firewall problem)
Hint: The Certificate Authority failed to verify the temporary nginx configuration changes made by Certbot. Ensure the listed domains point to this nginx server and that it is accessible from the internet.
上記よりこれらの機器は干渉しているのでしょうか、またafterで「ファイアウォールの問題の可能性があります」のエラー内容が出ました。なにかコメントを頂ければ幸いです。 また長々の問い合わせを恐縮しております。
afterの状態で:原因かは不明ですが、filtered が気になっています
$ nmap signpost.mydns.bz
PORT STATE SERVICE
23/tcp open telnet
53/tcp open domain
80/tcp filtered http
139/tcp open netbios-ssn
443/tcp open https
445/tcp open microsoft-ds
shin2さん
ご回答有り難うございます。
自宅サーバ環境でWebサーバを公開されているのですね。
何点か質問させてください。
・運用ドメインについて
運用ドメインは以下の2ドメインを別のサーバで運用しているのですね。
signpost.mydns.jp Raspi4
signpost.mydns.bz ThinkCentre
signpost.mydns.bzはRaspi4にもコンテンツがあるのでしょうか?
・インターネットから自宅サーバへのHTTP通信転送について
digで確認すると両ドメインはどちらも同じIPみたいですが、これはどのようにRaspi4とThinkCentreにhttpアクセスの振り分けを行っているのですか?
推測になりますが、auホームゲートウェイかバッファロー親機で行っているhttpアクセスの転送設定で転送先がRaspi4になっていませんか?
・ThinkCentreにHTTP接続ができているかの確認
certbotの実行はThinkCentreで行っているようですが、Webサーバのアクセスログを確認して「signpost.mydns.bz/.well-known/acme-challenge/」への通信ログがあるかどうか確認してみてください。
あわせて、Raspi4側のアクセスログも確認して「signpost.mydns.bz/.well-known/acme-challenge/」への通信があるかどうか確認してみてください。
・今回の原因の推測
とりあえず、現在頂いた情報での推測です。
Raspi4側に「signpost.mydns.bz/.well-known/acme-challenge」へのアクセスログがあれば、ThinkCentre側にHTTPアクセスが届いていないのが今回の原因ではないかと考えられます。
ThinkCentreでcertbotを実行すると、Let’sEncryptからのドメイン確認通信がRaspi4側のWebサーバに行っているが、そこには「.well-known/acme-challenge/xxxxx」ディレクトリが作成されていないので404のエラーが起きているようにみえます。
Raspi4をシャットダウンすると、通信がTimeoutしているのもそうだ判断した理由です。
もし、この環境で証明書を取得するのであれば、Raspi4側でcertbotを実行して証明書を取得し、ThinkCentreへの移行作業が完了後に再度証明書を取りりなおすとかはどうでしょうか?
以上、推測なので間違いがあるかもしれませんが、確認の方をおねがいします。
※最後に、コマンドの実行ログにメールアドレスがそのまま記述されていたので、申し訳ありませんが勝手にマスクさせてもらいました。
tamohiko様
リプレイが遅くなり申し訳有りません
また多くのご指導有難うございます。
問い合わせの回答をお送りします。宜しくお願いいたします
・運用ドメインについて
運用ドメインは以下の2ドメインを別のサーバで運用しているのですね。
signpost.mydns.jp Raspi4
signpost.mydns.bz ThinkCentre
>>>はいそうです
signpost.mydns.bzはRaspi4にもコンテンツがあるのでしょうか?
>>>Raspi4には*.mydns.bzのサイトは有りません
・インターネットから自宅サーバへのHTTP通信転送について
digで確認すると両ドメインはどちらも同じIPみたいですが、これはどのようにRaspi4とThinkCentreにhttpアクセスの振り分けを行っているのですか?
>>>おそらく1)~3)に回答が有るのでしょうか?
1) MyDNS.JPに登録した時にIPv4 Addrのアドレスはドメイン名に関係なく全て同じ 36.14.247.*** (動的IP)でした
2)バーチャルサーバーの名前ベースを利用しています
https://zenn.dev/nagan/articles/bd081222536f8e
3) windowsのhostsを設定
hosts ファイルは C:\Windows\System32\drivers\etc に設置されています( Windows 10 の場合)
hostsへの編集は管理者権限で起動したテキストエディタで最後に次の行追加する
# 最後に追加入力
192.168.0.51 signpost.mydns.jp
192.168.0.51 ashitahe.mydns.jp
192.168.0.71 signpost.mydns.bz
192.168.0.71 ashitahe.mydns.bz
PC再起動
サイトにアクセス確認
下記のアドレスクリックそのページが開きます
https://signpost.mydns.jp <<>raspi
https://ashitahe.mydns.jp <<>raspi
http://signpost.mydns.bz <<>ThinkCentre
http://ashitahe.mydns.bz <<>ThinkCentre
推測になりますが、auホームゲートウェイかバッファロー親機で行っているhttpアクセスの転送設定で転送先がRaspi4になっていませんか?
>>>auホームゲートウェイ、バッファロー親機とも転送設定していないはずです。設定した記憶もないです。
しいて言えば、auホームゲートウェイのポートマッピング設定↓が関係するのでしょうか?
LAN側ホスト プロトコル ポート番号 優先度
192.168.0.51 TCP 443 1
192.168.0.51 TCP 80 2
192.168.0.71 TCP 443 3
192.168.0.71 TCP 80 4
その後
サーバー設定を一応以下の様に直しましたが、結果は同じでした
Raspi4 listen 80; >>> listen 192.168.0.51:80;
ThinkCentre listen 80; >>> listen 192.168.0.71:80;
・ThinkCentreにHTTP接続ができているかの確認
certbotの実行はThinkCentreで行っているようですが、Webサーバのアクセスログを確認して「signpost.mydns.bz/.well-known/acme-challenge/」への通信ログがあるかどうか確認してみてください。
あわせて、Raspi4側のアクセスログも確認して「signpost.mydns.bz/.well-known/acme-challenge/」への通信があるかどうか確認してみてください。
>>>問い合わせですが、 */.well-known/acme-challenge/ は何を入れるものなのか、及びこのデレクトリーは自分で作るものか、わかっていませんし又通信ログの確認方法も理解していません。
ちなみにそれらのデレクトリーはRaspiのOSに見当たりません。(FFFTPに於いて 「.で始まるファイルを表示」で調べました)
ThinkCentre:下記の様に変えていました
# for certbot challenges (renewal process)
location ~ ^/.well-known/acme-challenge/ {
root /home/www/letsencrypt; >>>デレクトリまでは作成しています
allow all;
try_files $uri =404;
}
結果ですが、2025-04-22 15:11の投稿のままです
アクセスログは確認できていませんが、tamohiko様が推測する通り certbotがRaspiにアクセスしているのでしょう
何かアドバイスが有りますでしょうか…
shin2さん
ご回答ありがとうございました。
頂いた情報から現状の問題点を推測してみました。
・インターネットからのHTTP/HTTPSアクセスが、意図せずauホームゲートウェイのポートマッピング設定によってRaspi (192.168.0.51) へ優先的に転送されている可能性が高い
・ThinkCentreでcertbotを実行しているにも関わらず、Let’s Encryptからの認証リクエストがRaspiに届いている可能性がある
今後の確認事項として、両サーバのNginxアクセスログを確認し、インターネットからのHTTPアクセスとLet’s Encryptからの認証リクエストがどちらに届いているか確認していただけますか?
確認手順は下記の内容を参照願います。
>>・インターネットから自宅サーバへのHTTP通信転送について
> 1) MyDNS.JPに登録した時にIPv4 Addrのアドレスはドメイン名に関係なく全て同じ 36.14.247.*** (動的IP)でした
> 2)バーチャルサーバーの名前ベースを利用しています
https://zenn.dev/nagan/articles/bd081222536f8e
> 3) windowsのhostsを設定
> hosts ファイルは C:\Windows\System32\drivers\etc に設置されています( Windows 10 の場合)
> hostsへの編集は管理者権限で起動したテキストエディタで最後に次の行追加する
> # 最後に追加入力
> 192.168.0.51 signpost.mydns.jp
> 192.168.0.51 ashitahe.mydns.jp
> 192.168.0.71 signpost.mydns.bz
> 192.168.0.71 ashitahe.mydns.bz
> PC再起動
> サイトにアクセス確認
> 下記のアドレスクリックそのページが開きます
これはhostsファイルを設定したWindowsからアクセスした結果ということですよね?
インターネット側からアクセスする場合、「signpost.mydns.jp」と「signpost.mydns.bz」はどちらも同じ36.14.247.*** (動的IP) にDNSによって名前解決されるため、ホスト名だけでは「raspi」と「ThinkCentre」への通信を区別できません。
試しにraspiとThinkCentreの両方で、以下のコマンド使用してNginxのアクセスログを確認しながら、スマホとかを使用しインターネット経由で両方のサイトsignpost.mydns.jpとsignpost.mydns.bzにアクセスしてみてください。
$ sudo tail -f /var/log/nginx/access.log
アクセスがあった方にログが出力されるので、どちらのサーバに通信が行っているかを確認することができます。
>> 推測になりますが、auホームゲートウェイかバッファロー親機で行っているhttpアクセスの転送設定で転送先がRaspi4になっていませんか?
> >>>auホームゲートウェイ、バッファロー親機とも転送設定していないはずです。設定した記憶もないです。
> しいて言えば、auホームゲートウェイのポートマッピング設定↓が関係するのでしょうか?
> LAN側ホスト プロトコル ポート番号 優先度
> 192.168.0.51 TCP 443 1
> 192.168.0.51 TCP 80 2
> 192.168.0.71 TCP 443 3
> 192.168.0.71 TCP 80 4
機器によって名称は異なりますが、ポートマッピングと転送設定(ポート転送)は同様の機能で、特定のポート宛の通信を設定されたホストに転送する設定のことについて質問させていただきました。(分かりづらくてすいませんでした)
見た感じ、インターネット側から「443」と「80」番ポート宛の通信があった場合、優先度の高い「192.168.0.51」転送されているようです。
※「192.168.0.51」のサーバへ通信ができない場合、どのような挙動をするか分かりませんが、私の家の機器では次に優先度の高いサーバへ通信が転送されるということはありませんでした。
>> ・ThinkCentreにHTTP接続ができているかの確認
>> certbotの実行はThinkCentreで行っているようですが、Webサーバのアクセスログを確認して「signpost.mydns.bz/.well-known/acme-challenge/」への通信ログがあるかどうか確認してみてください。
>> あわせて、Raspi4側のアクセスログも確認して「signpost.mydns.bz/.well-known/acme-challenge/」への通信があるかどうか確認してみてください。
> >>>問い合わせですが、 */.well-known/acme-challenge/ は何を入れるものなのか、及びこのデレクトリーは自分で作るものか、わかっていませんし又通信ログの確認方法も理解していません。
> ちなみにそれらのデレクトリーはRaspiのOSに見当たりません。(FFFTPに於いて 「.で始まるファイルを表示」で調べました)
「.well-known/acme-challenge/xxx」(xxx部分はその都度かわります)ディレクトリは、certbotがドメインの確認用に一時的に作成します。
そこにLetsEncryptからhttpでアクセスし、アクセスすることが出来れば認証完了となります。
「.well-known/acme-challenge/xxx」へのアクセスログは、Nginxでログの出力先を変更していない場合は、access.logかerror.logに出力されているはずです。
OSがUbuntuであれば以下のコマンドで確認することができます。
$ sudo zgrep well-known /var/log/nginx/access.log*
$ sudo zgrep well-known /var/log/nginx/error.log*
両方のサーバで確認を行ってみてください。
これで、どちらのサーバにLetsEncryptから通信が来ているかを確認することができます。
訂正:下記の修正は機能しませんでしたので、初めに戻します
Raspi4 listen 80; >>> listen 192.168.0.51:80;
ThinkCentre listen 80; >>> listen 192.168.0.71:80;
tamohiko様
素早いコメント有難うございます
先ほどのコメント返しの後、ふと思ってサーバーの優先度を変えたら
certbotが通りました!!! これが原因とは
そう思って報告コメントしようと思ったら、すでにコメント返しを頂いていまして…
取り急ぎ報告いたしましす
まだcertbotが通った画面のままなので、またご指摘のエラーログ確認等
終わりましたら、改めてご報告いたします。これに一か月以上の足踏み状態が解消です
有難うございました。では後ほど
LAN側ホスト プロトコル ポート番号 優先度
192.168.0.71 TCP 443 1
192.168.0.71 TCP 80 2
192.168.0.51 TCP 443 3
192.168.0.51 TCP 80 4
PS返信のアイコンが見当たらなかったので、新規にご返事いたします
shin2さん
現状のお知らせありがとうございます。
無事certbotが通ったとのことで何よりです!
tamohiko様
その後の確認ですが
「サーバにLetsEncryptから通信が来ているかを確認する」ですが、アクセス及びエラーログを見ましたが、
Raspiではcrontabは定期的にジョブを実行するよう設定しているので、ボリュームが多くて中身の理解が出来ていません。
調べ方が解りましたので、中身は今後調べて行きたいと思います。
今回のまとめ (tamohiko様の回答と同じ内容ですが)
(自宅等の)自前webサーバーで、ハードウエア2台目に新規ウエブサイトを立ち上げる場合(1台目は運用済)
ハードウエアには固定IPアドレスを設定済みのうえ、ルーターのポート開放をしなければなりません。
今回のポート開放ルーターは auホームゲートウェイBL902HWです。
https://www.akakagemaru.info/port/bl900hw.html
(auホームゲートウェイBL902HWはルーターモード、他のルーターは全てブリッジモードに設定)
ルーターのポート80の開放が複数ある場合、Let’s Encrty SSL証明書取得のcertbotを実行に於いて
認証リクエストがポート80の優先度1番に自動的にアクセスが来るので、取得したいIPアドレスはポート80の中で
優先順位上位に設定しないとエラーになります。エラーの説明は複雑なので割愛します
又、運用済の443は優先度上位に設定しておきます
注:優先順位の無いルーターは定かでは有りません
auホームゲートウェイBL902HWのポートマッピング設定
1台目:*.*.*.11 2台目:*.*.*.21 (SSL証明書を取得したいポート)
LAN側ホスト プロトコル ポート番号 優先度
192.168.0.11 TCP 443 1
192.168.0.21 TCP 443 2
192.168.0.21 TCP 80 3
192.168.0.11 TCP 80 4
最後にですが
一個人に対して細かい御指導を頂きまして有難うございました
これで暫くの足踏み状態から解放され、次の作業に進めます
再度有難うございました、これをもって解決と致します。
ではでは shin2より
PS:だいぶ板を汚しましたので、しばらく経ちましたら、クリアして頂いて結構です
shin2さん
ご丁寧にご連絡ありがとうございます。
足踏み状態の解決をお手伝いできて良かったです!
また何かあればお気軽にご質問ください。
できる範囲でお手伝いさせて頂きます。