
Ubuntu20.04にMariaDBインストール(MariaDB公式リポジトリを使用)
「Ubuntu Server 20.04」のデフォルトリポジトリにあるMariaDBはバージョンが少し古いので、MariaDB公式リポジトリを使用して新しいバージョンのMariaDBをインストールする方法です。
作業は下記の工程で行っていきます。
- MariaDBリポジトリの追加
- インストール
- mysql_secure_installation
- 文字コード設定
「UbuntuServer 24.04」での手順はこちらで解説しています。
https://vpslife.server-memo.net/ubuntu2404_mariadb-repo_install/
MariaDBリポジトリ追加
MariaDB用のリポジトリは、下記URLにアクセスするとリポジトリを作成するための画面が表示されますので、それを利用し作成していきます。
https://downloads.mariadb.org/mariadb/repositories/
画面に表示されているメニューを下記の順番で選択していきます。
- 1. Choose a DistributionでUbuntuのバージョンを選択
- 2. Choose a MariaDB Server Versionで使用したいMariaDBのバージョンを選択
- 3. MirrorでMariaDB Serverのダウンロード元となるミラーサーバを選択
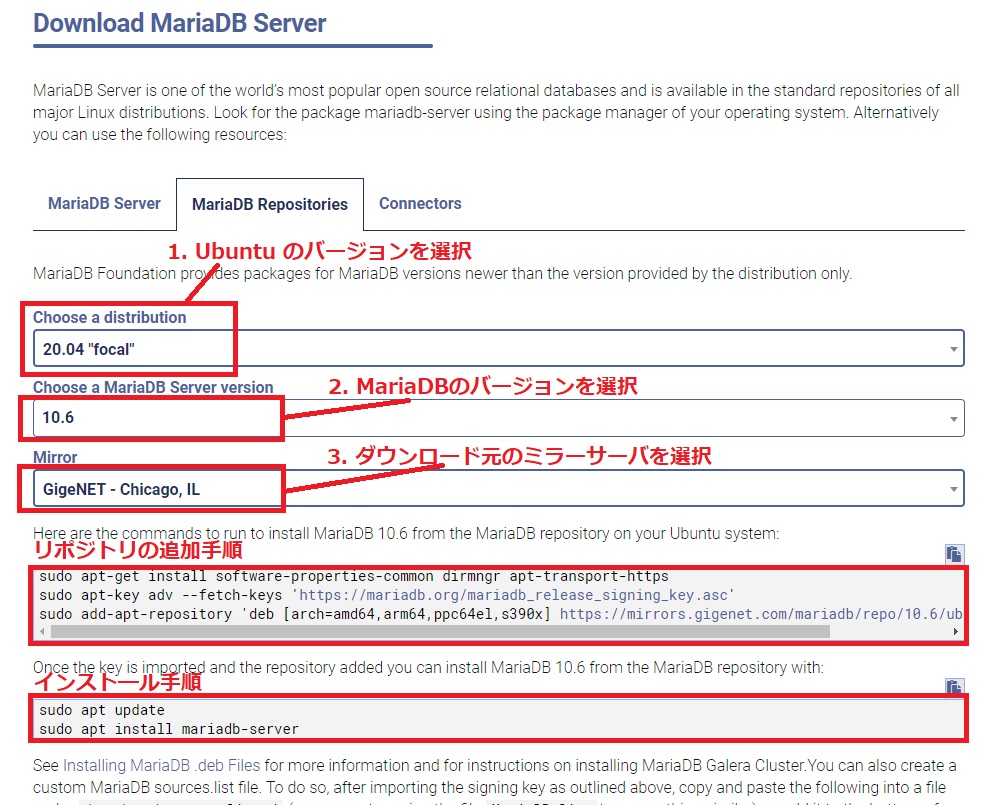
選択が完了するとリポジトリを作成するためのコマンドが表示されるので、内容をコピペするなりしてコマンド実行するとリポジトリが作成されます。
sudo apt-get install software-properties-common dirmngr apt-transport-https
sudo apt-key adv --fetch-keys 'https://mariadb.org/mariadb_release_signing_key.asc'
sudo add-apt-repository 'deb [arch=amd64,arm64,ppc64el,s390x] https://mirrors.gigenet.com/mariadb/repo/10.6/ubuntu focal main'
追加されたリポジトリの場所
追加されたMariaDB用のリポジトリ設定は「/etc/apt/sources.list」ファイルに追加されています。
$ grep mariadb /etc/apt/sources.list
deb [arch=s390x,amd64,ppc64el,arm64] https://mirrors.gigenet.com/mariadb/repo/10.6/ubuntu focal main
# deb-src [arch=s390x,amd64,ppc64el,arm64] https://mirrors.gigenet.com/mariadb/repo/10.6/ubuntu focal main
インストール
リポジトリの追加が完了しましたら、aptコマンドを使用してMariaDBのインストールを行います。
$ sudo apt update
$ sudo apt install mariadb-server
mysql_secure_installation
MariaDBのインストールが完了しましたら、「mysql_secure_installation」を実行してセキュリティを向上させるための設定を行っておきましょう。
$ sudo mysql_secure_installation
「mysql_secure_installation」を実行すると下記の質問が表示されるので、下記の通り質問に答えていってください。
- Enter current password for root (enter for none):
- 現在MariaDBのrootユーザに設定されているパスワードの入力
- インストール直後はパスワードが設定されていないので「Enter」キーを押下します
- Switch to unix_socket authentication [Y/n]
- unix socketを使用した認証に切り替えるかの設定
- 切り替えないので「n」を入力します
- Change the root password? [Y/n]
- MariaDBのrootユーザのパスワードを変更するかの設定
- パスワードを設定したいので「y」を入力します
- 「New password: 」でパスワードを設定し「Re-enter new password: 」で再度同じパスワードを設定します
- Remove anonymous users? [Y/n]
- anonymousユーザを削除するかの設定
- 必要ないので「y」を入力し削除します
- Disallow root login remotely? [Y/n]
- MariaDBのrootユーザのリモートログインを禁止するかの設定
- 禁止するので「y」を入力
- Remove test database and access to it? [Y/n]
- testデータベースを削除するかの設定
- 削除するので「y」を入力します
- Reload privilege tables now? [Y/n]
- ユーザ情報の設定を反映させるかの設定
- 反映させたのいので「y」を入力します
下記は実際の実行例です。
$ sudo mysql_secure_installation

NOTE: RUNNING ALL PARTS OF THIS SCRIPT IS RECOMMENDED FOR ALL MariaDB
      SERVERS IN PRODUCTION USE!  PLEASE READ EACH STEP CAREFULLY!

In order to log into MariaDB to secure it, we'll need the current
password for the root user. If you've just installed MariaDB, and
haven't set the root password yet, you should just press enter here.

Enter current password for root (enter for none):  # Enterキーを押下
OK, successfully used password, moving on...

Setting the root password or using the unix_socket ensures that nobody
can log into the MariaDB root user without the proper authorisation.

You already have your root account protected, so you can safely answer 'n'.

Switch to unix_socket authentication [Y/n] n   # nを入力
 ... skipping.

You already have your root account protected, so you can safely answer 'n'.

Change the root password? [Y/n] y   # yを入力してパスワードを変更
New password:                 # パスワードを設定
Re-enter new password:        # パスワードの再入力
Password updated successfully!
Reloading privilege tables..
 ... Success!


By default, a MariaDB installation has an anonymous user, allowing anyone
to log into MariaDB without having to have a user account created for
them.  This is intended only for testing, and to make the installation
go a bit smoother.  You should remove them before moving into a
production environment.

Remove anonymous users? [Y/n] y   # yを入力してanonymousを削除
 ... Success!

Normally, root should only be allowed to connect from 'localhost'.  This
ensures that someone cannot guess at the root password from the network.

Disallow root login remotely? [Y/n] y   # yを入力してrootユーザのリモートログインを禁止
 ... Success!

By default, MariaDB comes with a database named 'test' that anyone can
access.  This is also intended only for testing, and should be removed
before moving into a production environment.

Remove test database and access to it? [Y/n] y   # yを入力してtestデータベースを削除
 - Dropping test database...
 ... Success!
 - Removing privileges on test database...
 ... Success!

Reloading the privilege tables will ensure that all changes made so far
will take effect immediately.

Reload privilege tables now? [Y/n] y   # yを入力して設定を反映
 ... Success!

Cleaning up...

All done!  If you've completed all of the above steps, your MariaDB
installation should now be secure.

Thanks for using MariaDB!
文字コード設定
MariaDBで主に日本語のデータを使用する場合は、文字化けを防ぐためにMariaDBサーバとクライアント両方の文字コード設定を「utf8mb4 」にしておきます。
ちなみに「utf8mb4」とは、絵文字を含む4バイトの日本語を使用する際の設定となります。
サーバ設定
サーバ側の設定ファイルは「/etc/mysql/mariadb.conf.d/50-server.cnf」となります。
Ubuntuでは初期設定で下記の設定がされていると思いますが念のため確認しておきます。
- character-set-server = utf8mb4
- collation-server = utf8mb4_general_ci
$ cd /etc/mysql/mariadb.conf.d
$ grep utf8mb4 50-server.cnf
character-set-server  = utf8mb4
collation-server      = utf8mb4_general_ci
実際の設定は「50-server.cnf」ファイルの「Character sets」の部分で行われています。
#
# * Character sets
#

# MySQL/MariaDB default is Latin1, but in Debian we rather default  the full
# utf8 4-byte character set. See also client.cnf
character-set-server  = utf8mb4
collation-server      = utf8mb4_general_ci
クライアント設定
クライアントの設定ファイルは「/etc/mysql/mariadb.conf.d/50-client.cnf」となります。
こちらの方は「utf8mb4」の設定がされていないので、[client-mariadb]の部分に「default-character-set = utf8mb4」の設定を追加する必要があります。
$ sudo cp -p 50-client.cnf 50-client.cnf_`date +%Y%m%d-%H%M%S`
$ sudo vi 50-client.cnf
下記の部分に「default-character-set = utf8mb4」の設定を追加します。
[client-mariadb]
default-character-set = utf8mb4   # 追加します
設定反映
MariaDBを再起動して設定を反映させます。
$ sudo systemctl restart mariadb
文字コードが「utf8mb4」に設定されているかは、mysqlコマンドでmariadbサーバに接続し下記の方法で確認することが出来ます。
$ mysql -u root -p
MariaDB [(none)]> SHOW VARIABLES LIKE 'character_set%';
+--------------------------+----------------------------+
| Variable_name            | Value                      |
+--------------------------+----------------------------+
| character_set_client     | utf8mb4                    |
| character_set_connection | utf8mb4                    |
| character_set_database   | utf8mb4                    |
| character_set_filesystem | binary                     |
| character_set_results    | utf8mb4                    |
| character_set_server     | utf8mb4                    |
| character_set_system     | utf8mb3                    |
| character_sets_dir       | /usr/share/mysql/charsets/ |
+--------------------------+----------------------------+
8 rows in set (0.001 sec)

MariaDB [(none)]> exit
Bye

コメント